
Submit a Leave of Absence Request
Leave of Absence Requests can be submitted in Your Self-Service or by speaking with your Leave Coordinator. Training on Leave of Absence policy (Family Medical Leave, Military Leave, Jury Duty, etc.) can be found here.
| STEP 1 | In Your Self-Service, log in as an Employee. |
Employee Home Page
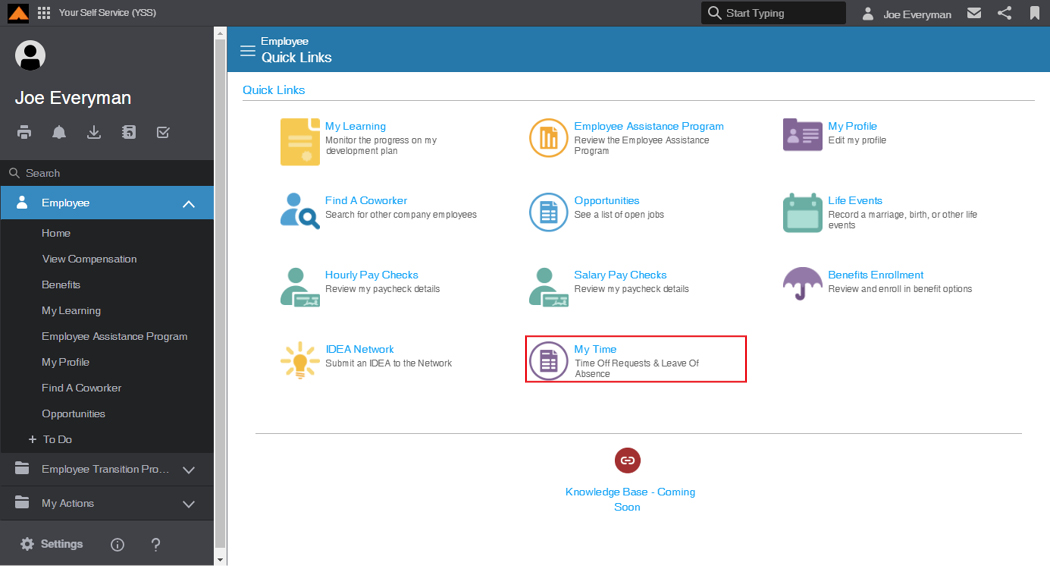
| STEP 2 | From the Quick Links, click My Time. |
The My Time page displays.

My Time Page
| STEP 3 | In the Available for Request section, view your Vacation Balance. |
| STEP 4 | On the Calendar, select the day you would like to take off. |
The Click one of the following message displays.

Click one of the following Message
|
NOTE |
A Time Off Request is for approved time off using your bank of available hours, or a qualifying life event such as a birth or funeral. A Leave of Absence must be coordinated with your site Leave Coordinator. |
| STEP 5 | Click the Leave of Absence button. |
The Leave Of Absence Request form displays.
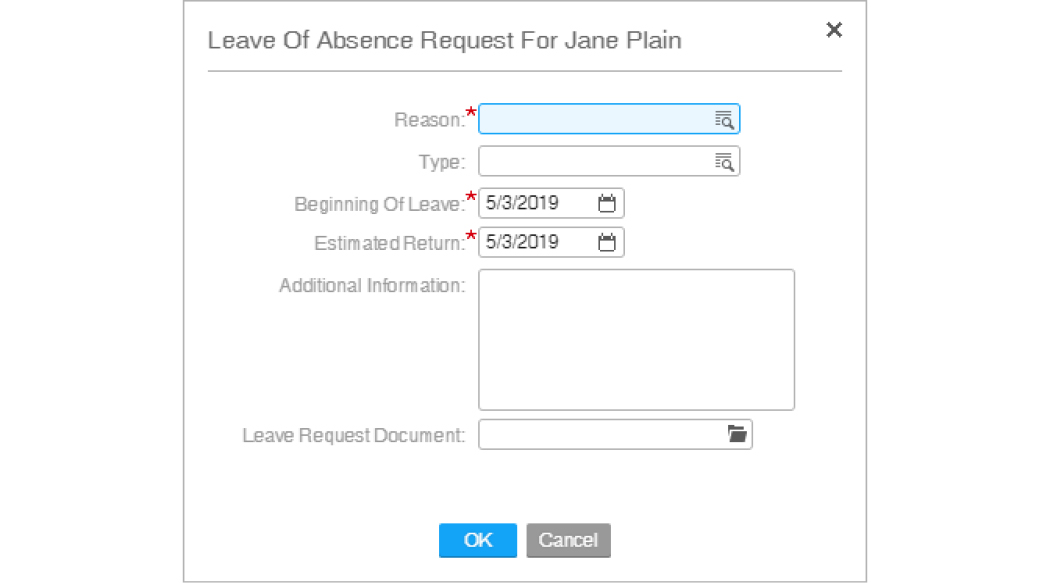
Leave of Absence Request Form
| STEP 6 | In the Reason field, select the reason for your Leave of Absence. |
| STEP 7 | In the Beginning Of Leave field, select the start date for your Leave of Absence. |
| STEP 8 | In the Estimated Return field, select your expected return date. |
The Leave of Absence request displays on the calendar.
Your Leave Coordinator will review the request and approve or deny your request according to company policy.
You will receive an email when your Leave Coordinator approves the request. Your Leave Coordinator will assist you with next steps for your specific type of leave.
Cancel a Leave of Absence Request
Employees can only cancel a Leave of Absence Request before the selected date. If you need help with previous leave requests, contact your HR Rep.
| STEP 1 | In Your Self-Service, log in as an Employee. |
Employee Home Page
| STEP 2 | From the Quick Links, click My Time. |
The My Time page displays.
[img]
My Time Page
| STEP 3 | On the Calendar, click the Leave of Absence Request you would like to cancel. |
The Leave Request window displays.
[img]
Leave Request Window
| STEP 4 | Click the Cancel button. |
The Cancel Leave window displays.
[img]
Cancel Leave Window
| STEP 5 | In the Reason field, select the reason for canceling the request. |
| STEP 6 | In the Comments field, add any comments as necessary. |
| STEP 7 | Click the OK button. |
The Leave Request is canceled.